

In the previous article, we used the third method to implement DelayLoad. However, the previous article was written relatively simply and only explained how to implement. This article will explain why we need to do this and the principles behind it.
This will involve some relatively important classes in Android, as well as several relatively important functions in Activity lifecycle.
Actually, the principles here are quite simple, but to clarify the implementation process, it’s still a quite interesting thing. It will involve using some tools, adding debug code ourselves, and proceeding step by step. Through this, our understanding of Activity launch will be one layer deeper. I hope that after reading this, everyone will also get some help from it.
In the previous article, the core method of DelayLoad we ultimately used was to add the following method in the Activity’s onCreate function:
1 | getWindow().getDecorView().post(new Runnable() { |
Let’s look at the involved classes and methods one by one.
1. Activity.getWindow and PhoneWindow Initialization Timing
Activity’s getWindow method obtains a PhoneWindow object:
1 | public Window getWindow() { |
This mWindow is a PhoneWindow object, and its initialization timing is when this Activity attaches:
1 | final void attach(Context context, ActivityThread aThread, |
Note that Activity’s attach method is called quite early, earlier than Activity’s onCreate method.
Summary:
- The one-to-one relationship between PhoneWindow and Activity should be clearer through the above initialization process.
- Android’s comment on PhoneWindow is: “Android-specific Window,” visible its importance.
- PhoneWindow has many methods that everyone is relatively familiar with, such as setContentView/addContentView, etc.; it also has several important internal classes, such as: DecorView;
2. PhoneWindow.getDecorView and DecorView Initialization Timing
Earlier we said that DecorView is an internal class of PhoneWindow, and its definition is as follows:
1 | private final class DecorView extends FrameLayout implements RootViewSurfaceTaker |
So when is DecorView initialized? DecorView is initialized in the Activity’s parent class’s onCreate method. For example, MainActivity in my example inherits from android.support.v7.app.AppCompatActivity. When we call MainActivity’s super.onCreate(savedInstanceState);, the following will be called:
1 | protected void onCreate( Bundle savedInstanceState) { |
Since we imported the AppCompatActivity from the support.v7 package, getDelegate() gets us AppCompatDelegateImplV7, and its onCreate method is as follows:
1 | public void onCreate(Bundle savedInstanceState) { |
That is, here’s mWindow.getDecorView(), which instantiates the DecorView:
1 | public final View getDecorView() { |
When getDecorView is called for the first time, it enters the installDecor method, which performs a series of initializations on the DecorView. Among the more important methods are: generateLayout/generateLayout, etc. generateLayout will retrieve relevant attributes from the current Activity’s Theme and set them to the Window, while also initializing a startingView and adding it to the DecorView—that’s what we call the startingWindow.
Summary
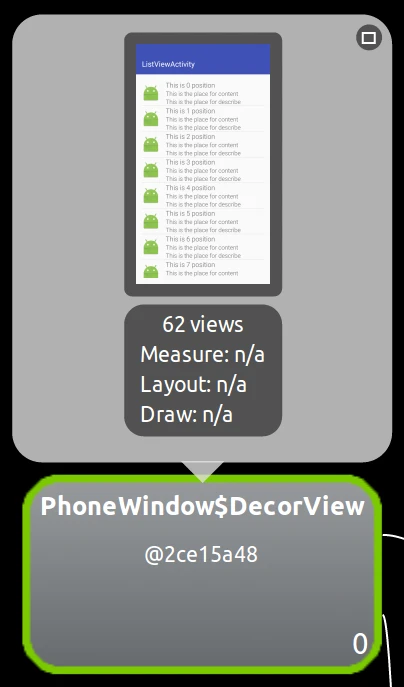
- Decor has the meaning of decoration. DecorView’s official comment is “This is the top-level view of the window, containing the window decor.” We can understand that DecorView is the layout at the very bottom of our current Activity. So when we open DDMS to view the Tree Overview, we can discover that the rootmost View is the DecorView:
- When the application launches from the desktop, before the main Activity is displayed, if the theme doesn’t set the window background, then we’ll see white (this is also related to the phone’s ROM). If the app launch is very slow, then users have to watch the white screen for a while. If you want to avoid this, you can set WindowBackground in the Application or Activity’s Theme, so you can avoid the white screen (of course, now various manufacturers all have SplashActivity + ads, which I can also understand)
3. Post
When we call DecorView’s Post method, it will ultimately call View’s Post method because DecorView ultimately inherits from View:
1 | public boolean post(Runnable action) { |
Note the mAttachInfo here. When we call post in Activity’s onCreate, is mAttachInfo null at this time? The answer is that mAttachInfo is null at this time.
There’s a point here: what are Activity’s various callback functions for? Usually when we write apps ourselves, it seems like we handle everything in onCreate—is onResume? onStart? We don’t seem to involve them much, right? Actually, that’s not the case.
onCreate, as the name suggests, is Create. Earlier we saw that Activity’s onCreate function performed many initialization operations, including PhoneWindow/DecorView/StartingView/setContentView, etc., but onCreate only initialized these objects. What actually needs to be set as visible is in Resume. However, this is transparent to developers. Specifically, you can look at ActivityThread’s handleResumeActivity function. Besides calling Activity’s onResume callback, handleResumeActivity also initializes several relatively important classes: ViewRootImpl/ThreadedRenderer.
ActivityThread.handleResumeActivity:
1 | if (r.window == null && !a.mFinished && willBeVisible) { |
It’s mainly wm.addView(decor, l); this sentence connects the decorView with WindowManagerImpl. This sentence will ultimately call to WindowManagerGlobal’s addView function:
1 | public void addView(View view, ViewGroup.LayoutParams params, |
We know that ViewRootImpl is a core class in the View system, and its definition is as follows:
1 | public final class ViewRootImpl implements ViewParent, |
When ViewRootImpl is initialized, it will also initialize AttachInfo—that’s why mAttachInfo was null when we were in onCreate earlier. ViewRootImpl has many methods that we’re also quite familiar with and very important, such as performTraversals/performLayout/performMeasure/performDraw/draw, etc.
Continuing with addView’s root.setView(view, wparams, panelParentView); the view passed in is decorView, and root is ViewRootImpl. This function sets ViewRootImpl’s mView variable to the passed-in view—that is, the decorView. So now the relationship between ViewRootImpl and DecorView is also clear.
Coming full circle, let’s return to the Post function in the main title. Earlier we said that this Post method calls View’s Post function because attachInfo was null when we were in onCreate, so it will go to the following branch: ViewRootImpl.getRunQueue().post(action);
Note that the getRunQueue obtained here is not the MessageQueue inside the Looper, but rather a RunQueue object maintained by ViewRootImpl, whose core is an ArrayList:
1 | private final ArrayList<HandlerAction> mActions = new ArrayList<HandlerAction>(); |
When we execute Post, we’re essentially just wrapping the Runnable into a HandlerAction object and storing it in an ArrayList. When executeActions is executed, it takes the HandlerAction stored here and re-posts it through the executeActions method using the passed-in Handler object.
So when is the executeActions method executed? And which Handler is the passed-in Handler?
4. PerformTraversals
We discussed earlier that ViewRootImpl’s performTraversals method is a very core method, executed once per frame drawing, calling various measure/layout/draw, etc., ultimately handing the data to be displayed to hwui for rendering.
The executeActions we discussed in the previous section is executed within performTraversals:
1 | // Execute enqueued actions on every traversal in case a detached view enqueued an action |
We can see that the Handler passed in here is mAttachInfo.mHandler. In the previous section, we mentioned that mAttachInfo is initialized together when ViewRootImpl is initialized:
1 | mAttachInfo = new View.AttachInfo(mWindowSession, mWindow, display, this, mHandler, this); |
The mHandler here is a ViewRootHandler object:
1 | final class ViewRootHandler extends Handler{ |
We notice that ViewRootHandler doesn’t pass in a Looper object when created, which means that this ViewRootHandler’s Looper is the mainLooper.
Now we’ve clarified this— the runnable object we posted in onCreate will ultimately still be added to the MainLooper’s MessageQueue when it’s executed during the first performTraversals.
Going a full circle, we’ve finally explained the sentence at the very beginning of this article clearly. Of course, there are many irrelevant words in between, but I estimate very few people will have the patience to read through to here. So if you see this, you can increment an index in the comments below—here index = 0; let’s see how many people actually seriously read this article.
5. UpdateText
Continuing with performTraversals, we proceed to discuss. Speaking of which, in the first article, we mentioned that when an app starts at launch, it will only do actual drawing on the second execution of performTraversals. The reason is that on the first execution of performTraversals, it will go to EGL initialization logic, then performTraversals will be executed again.
So someone asked in the comments section of the previous article: why do we need to post again in the run method? If we directly execute the updateText method in the run method, then updateText will be executed after the first performTraversals, not after the first frame drawing is completed, so we posted again. So the general processing steps are as follows:
Step 1: Activity.onCreate –> Activity.onStart –> Activity.onResume
Step 2: ViewRootImpl.performTraversals –> Runnable
Step 3: Runnable –> ViewRootImpl.performTraversals
Step 4: ViewRootImpl.performTraversals –> UpdateText
Step 5: UpdateText
6. Summary
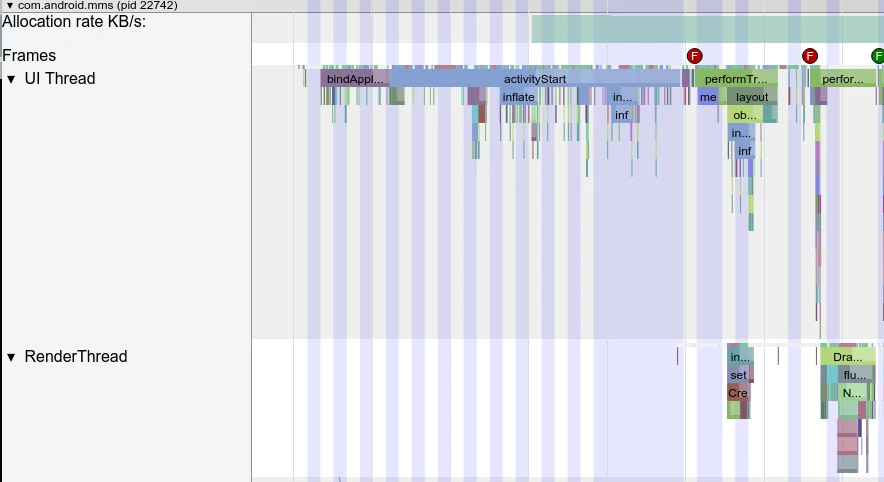
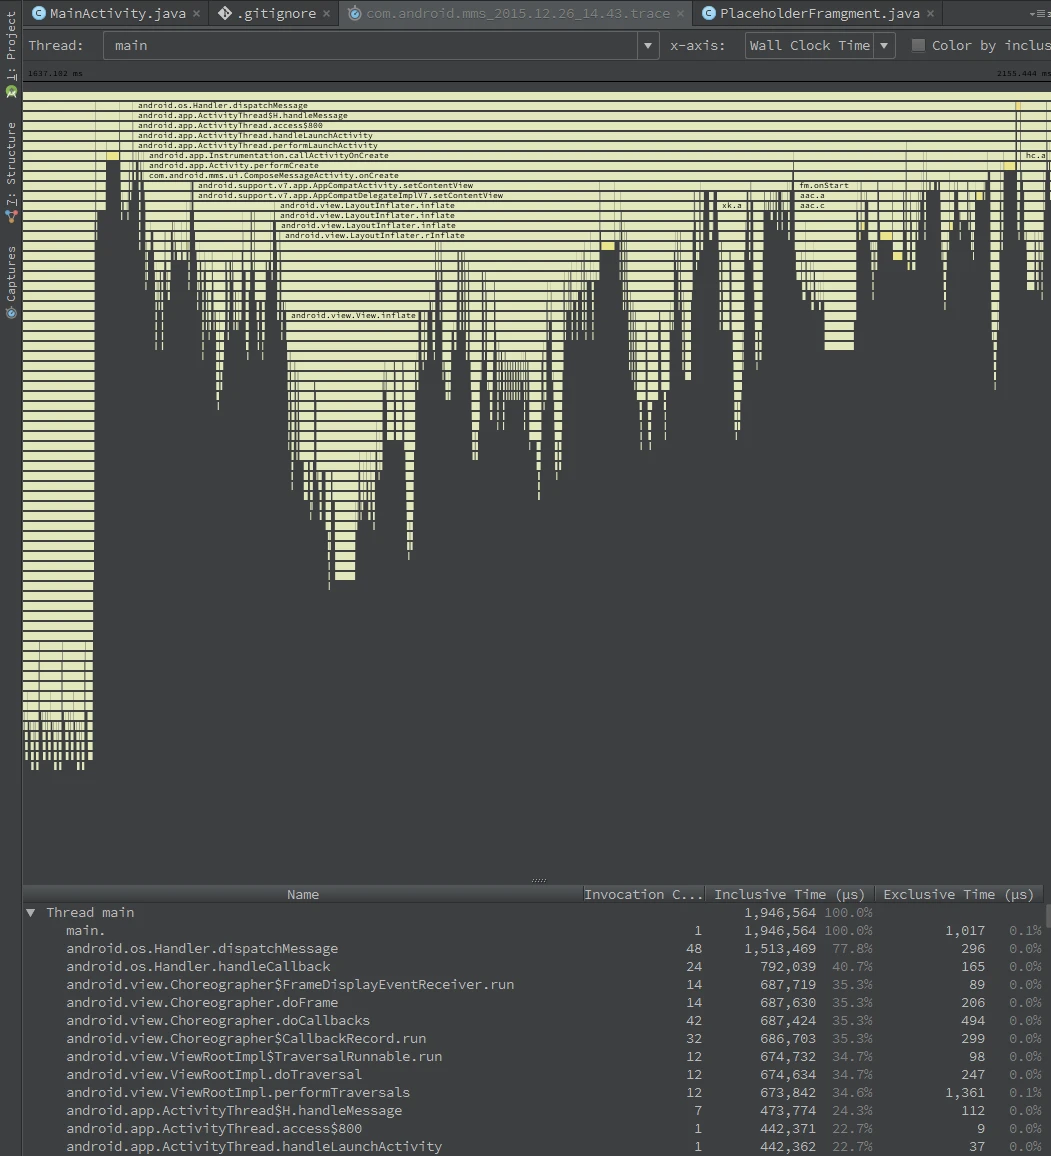
Actually, following it all the way through, we discover that the principle is actually quite simple. DelayLoad is actually just a very small point. The key is to teach everyone how to track a knowledge point or optimization that you’re not familiar with. Here we mainly used two tools: Systrace and Method Trace, as well as source code compilation and debugging.
Regarding the use of Systrace and Method Trace, there will be detailed articles introducing them later. These two tools are very helpful for understanding source code and some technical implementations.
Systrace
Method Trace
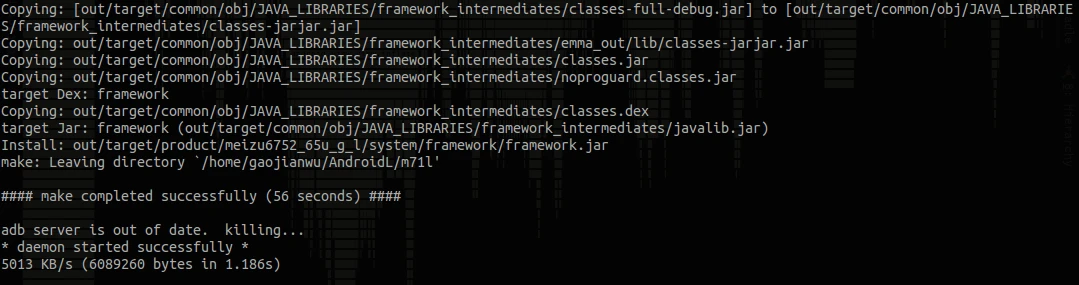
Source Code Compilation and Debugging
Code
The code involved in this article has been uploaded to GitHub:
https://github.com/Gracker/DelayLoadSample
About Me && Blog
Below is a personal introduction and related links. I look forward to communicating with colleagues in the same field. When three walk together, there must be my teacher!
- Blogger Personal Introduction: Inside are personal WeChat and WeChat group links.
- Blog Content Navigation: A navigation of personal blog content.
- Personally Organized and Collected Excellent Blog Articles - Essential Skills and Tools for Android Performance Optimization: Everyone is welcome to self-recommend and recommend (private WeChat chat is fine).
- Android Performance Optimization Knowledge Planet: Welcome to join, thank you for your support~
“If you want to go fast, go alone. If you want to go far, go together.”
