

This is the final article in our MAT series, detailing how to reconstruct original images from memory snapshots to debug leaks.
- Android Memory Optimization (1) - Introduction to MAT
- Android Memory Optimization (2) - Advanced MAT Usage
- Android Memory Optimization (3) - Viewing Original Bitmaps in MAT
When using MAT to analyze Android memory, you’ll frequently encounter Bitmap and BitmapDrawable$BitmapState objects. In many cases, these Bitmaps consume the majority of the heap. Memory leaks caused by Bitmaps are especially critical and must be handled promptly. When a potential image-related leak is found, seeing the actual image contents can be invaluable for diagnosis.
This article explains how to restore a Bitmap array object in MAT back into a viewable image.

1. Exporting Raw Bitmap Data
In MAT’s Dominator Tree view, select a Bitmap object and check the Inspector pane:
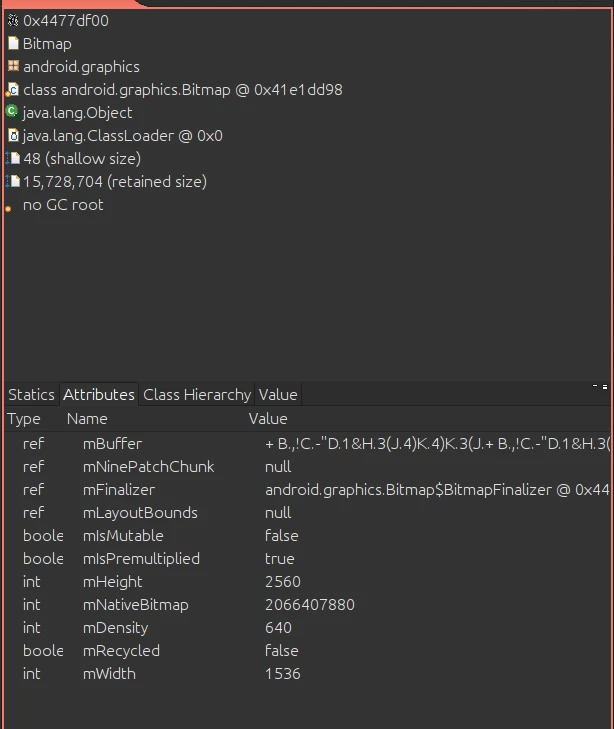
The Inspector shows essential information: mBuffer, mHeight, mWidth, and mNativeBitmap. Take note of the width and height, as we’ll need them later.
The mBuffer is defined in Bitmap.java:
1 | /** |
The pixel data is stored in this byte[] array. To export it, right-click either the mBuffer entry in the Inspector or the byte[] child of the Bitmap object in the Dominator Tree. Select Copy -> Save Value To File:
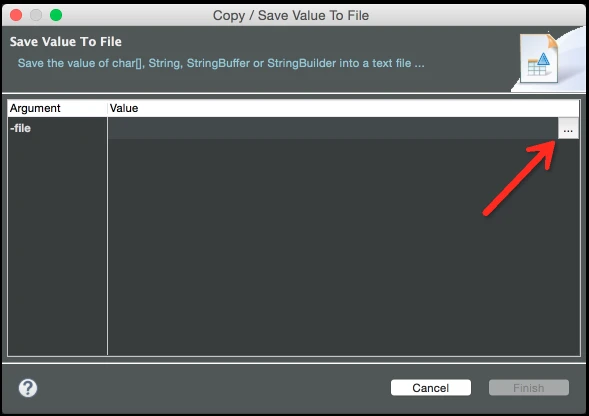
When saving, ensure the filename ends with the .data extension (or .raw for some tools).
2. Opening the Raw Data
Linux
Use the powerful image editor GIMP. Open GIMP and select File -> Open. Choose your exported .data file. An attribute dialog will appear:
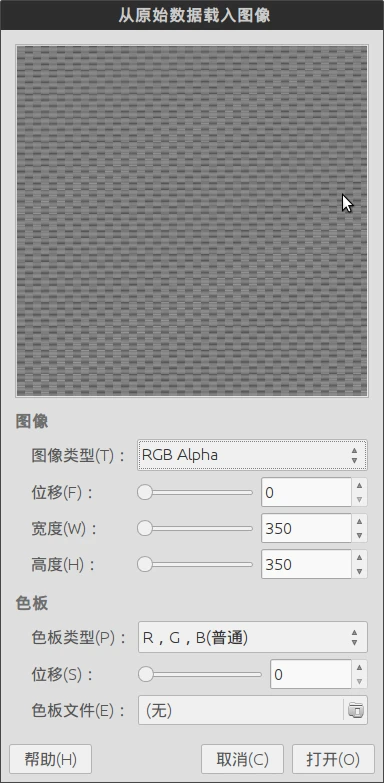
Set the Image Type to RGB Alpha. Enter the Width and Height precisely as you saw them in the MAT Inspector. Leave other settings at their defaults and click Open. GIMP will render the pixel data as an image.
Mac & Windows
If you use PhotoShop, ensure you saved the file with a .raw extension. When opening, set the depth to 32-bit, and provide the same width and height.
Alternatively, GIMP is also available for Mac and Windows. Using GIMP across all platforms provides a consistent, free, and feature-rich experience for this task.
About Me && Blog
(Links and introduction)